At our state conference, we hold extended hands-on workshops called
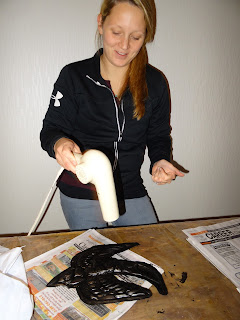
Friday After Dark workshops. It's a little crazy, attending or presenting a workshop that doesn't end until 11pm! This year, I chose to present a tooling foil workshop. The dinner before the workshops ran late, and so the workshops started late, so my group didn't leave until almost 11:30pm! And then of course I still had to pack it all up.... Anyhow, take a good look at that piece pictured above, because I'll be mentioning it again in a little bit.
Yup, that's me, above, explaining a process and looking a little chubby, I think. I guess I'd better work on that... That's my yoga frog apron I'm wearing. Namaste....
Anyhow - a lot of people use tooling foil with their students, but I'm a real bug about the process. I like the make sure the material is used to the max, resulting in a fairly deep relief. It's not hard to do, if you know how.. I gave specific instructions in
this post from a couple of years ago, so if you want details, hop on over
there. The process is the same now as it was then! But feel free to ask questions, either here on this post or on the older one.
Here's someone working on their piece,
that looked like this, below, at the end of the workshop. But it isn't finished. It can have ink added for antiquing, or color added, or both.
The mask on the left below has been antiqued with ink; the one on the right has not. By the way, after I took this photo, we reached into the back of the mask on the let and popped out the nose where it should be! I forgot to rephotograph it with its nose looking better.


To do the antiquing, we simply painted the surface with India ink. A light brush of soap (using a wet paintbrush) on the surface will help the ink stick better. Then when the ink is dry, it can be removed as desired with steel wool. The two gals below are speeding up the drying process with hair dryers. Let me note the gal on the left. She was very frustrated with her project, very unhappy. It was getting late, she was tired, and nothing looked right. Just like working with a student in school, I reminded her that it was all about learning the process, and was nothing more than a piece of foil. I told her not to sweat it if it didn't come out right, but encouraged her to finish the process and see how it worked out. No matter what, she knew I was giving her extra foil to take home. BUT... here's what happened! She inked it, and steel wooled it, and *POOF* it looked totally fabulous! It is the beautiful bird at the top of the post. I was glad I encouraged her not to give up!

We did discuss alternatives for adding color - using acrylic paints mixed with gloss for a translucent look, or Sharpie markers. Also, a technique I just learned - coloring with Sharpies and then using a paintbrush with rubbing alcohol to blend it, for a transparent color wash effect. Very cool.
So... this is my third convention post, and I still have more to tell you, especially about two really interesting workshops I attended. So my final convention post, post #4, will be in a few days. Meanwhile, feel free to let me know if you have any questions at all about tooling foil. In the meantime, I'll leave you with a
link to a blog post with some tooling foil masks made by my 6th grade students a few years ago. Enjoy!


No comments:
Post a Comment
Due to spam/phishing overload, comments are no longer being accepted on this blog. You can find There's a Dragon in my Art Room on Instagram if you wish to react to this blog or contact me.
Note: Only a member of this blog may post a comment.